The implication of “a poor craftsman blames his tools1” is that you should take responsibility for your failures rather than blaming your tools. And—yes, sure, own your outcomes, growth mindset, etc. But, also, if you have poor tools, that is a problem! A solvable problem! You (often) do not need to use poor tools. You can find better ones. And the more crucial a tool, the higher priority it is to find the best one.
An IDE (Integrated Development Environment) is one of a programmer’s most important tools. It’s the program you use to write software in the same way that MS Word (or Google Docs) is the program you use to write everything else. IDEs are so-called because they integrate a bunch of tools (text editing, compiling, debugging, etc) for development (programming) into a single environment (program). If you are using a text editor (notepad, vim with no extensions) to write code, you should absolutely switch to an IDE. If you are using a crappy IDE (perhaps because it came bundled with your compiler or is free from your hardware vendor), you should find a better one. Your time and attention are a scarce resource. Most of the time, they are the most scarce resource. You need an IDE that will use them effectively.
This guide explains how to set up VS Code for working with STM32 microcontrollers (MCUs). The former because VS Code is both free and good. The latter because STM32 MCUs are ubiquitous in industry and have great tooling2. But I hope it will be apparent that you can apply a similar approach to use VS Code with other compilers (e.g., IAR), other chips (e.g., NXP, Nordic), or other languages entirely (e.g., Rust, C#)3.
I will assume that you’ve arrived at this guide because you already have an STM32 board and VS Code installed (follow the link if you don’t), but otherwise you are starting from scratch.
STM32CubeMX
If you already have an STM32 project underway, you can skip this and go straight to the next section. Otherwise, the quickest way to get started with a runnable project is using STM32CubeMX. This is a tool for configuring STM32 MCUs and generating the corresponding initialization code (which, unlike STM’s IDE, is actually good).
I try to make all of my instructions scriptable, but this part unfortunately requires a lot of pointing and clicking, including creating an account with STM in order to download the tool. Follow the link above, then launch STM32CubeMX. Once you’re done installing. You will be greeted by this landing page:
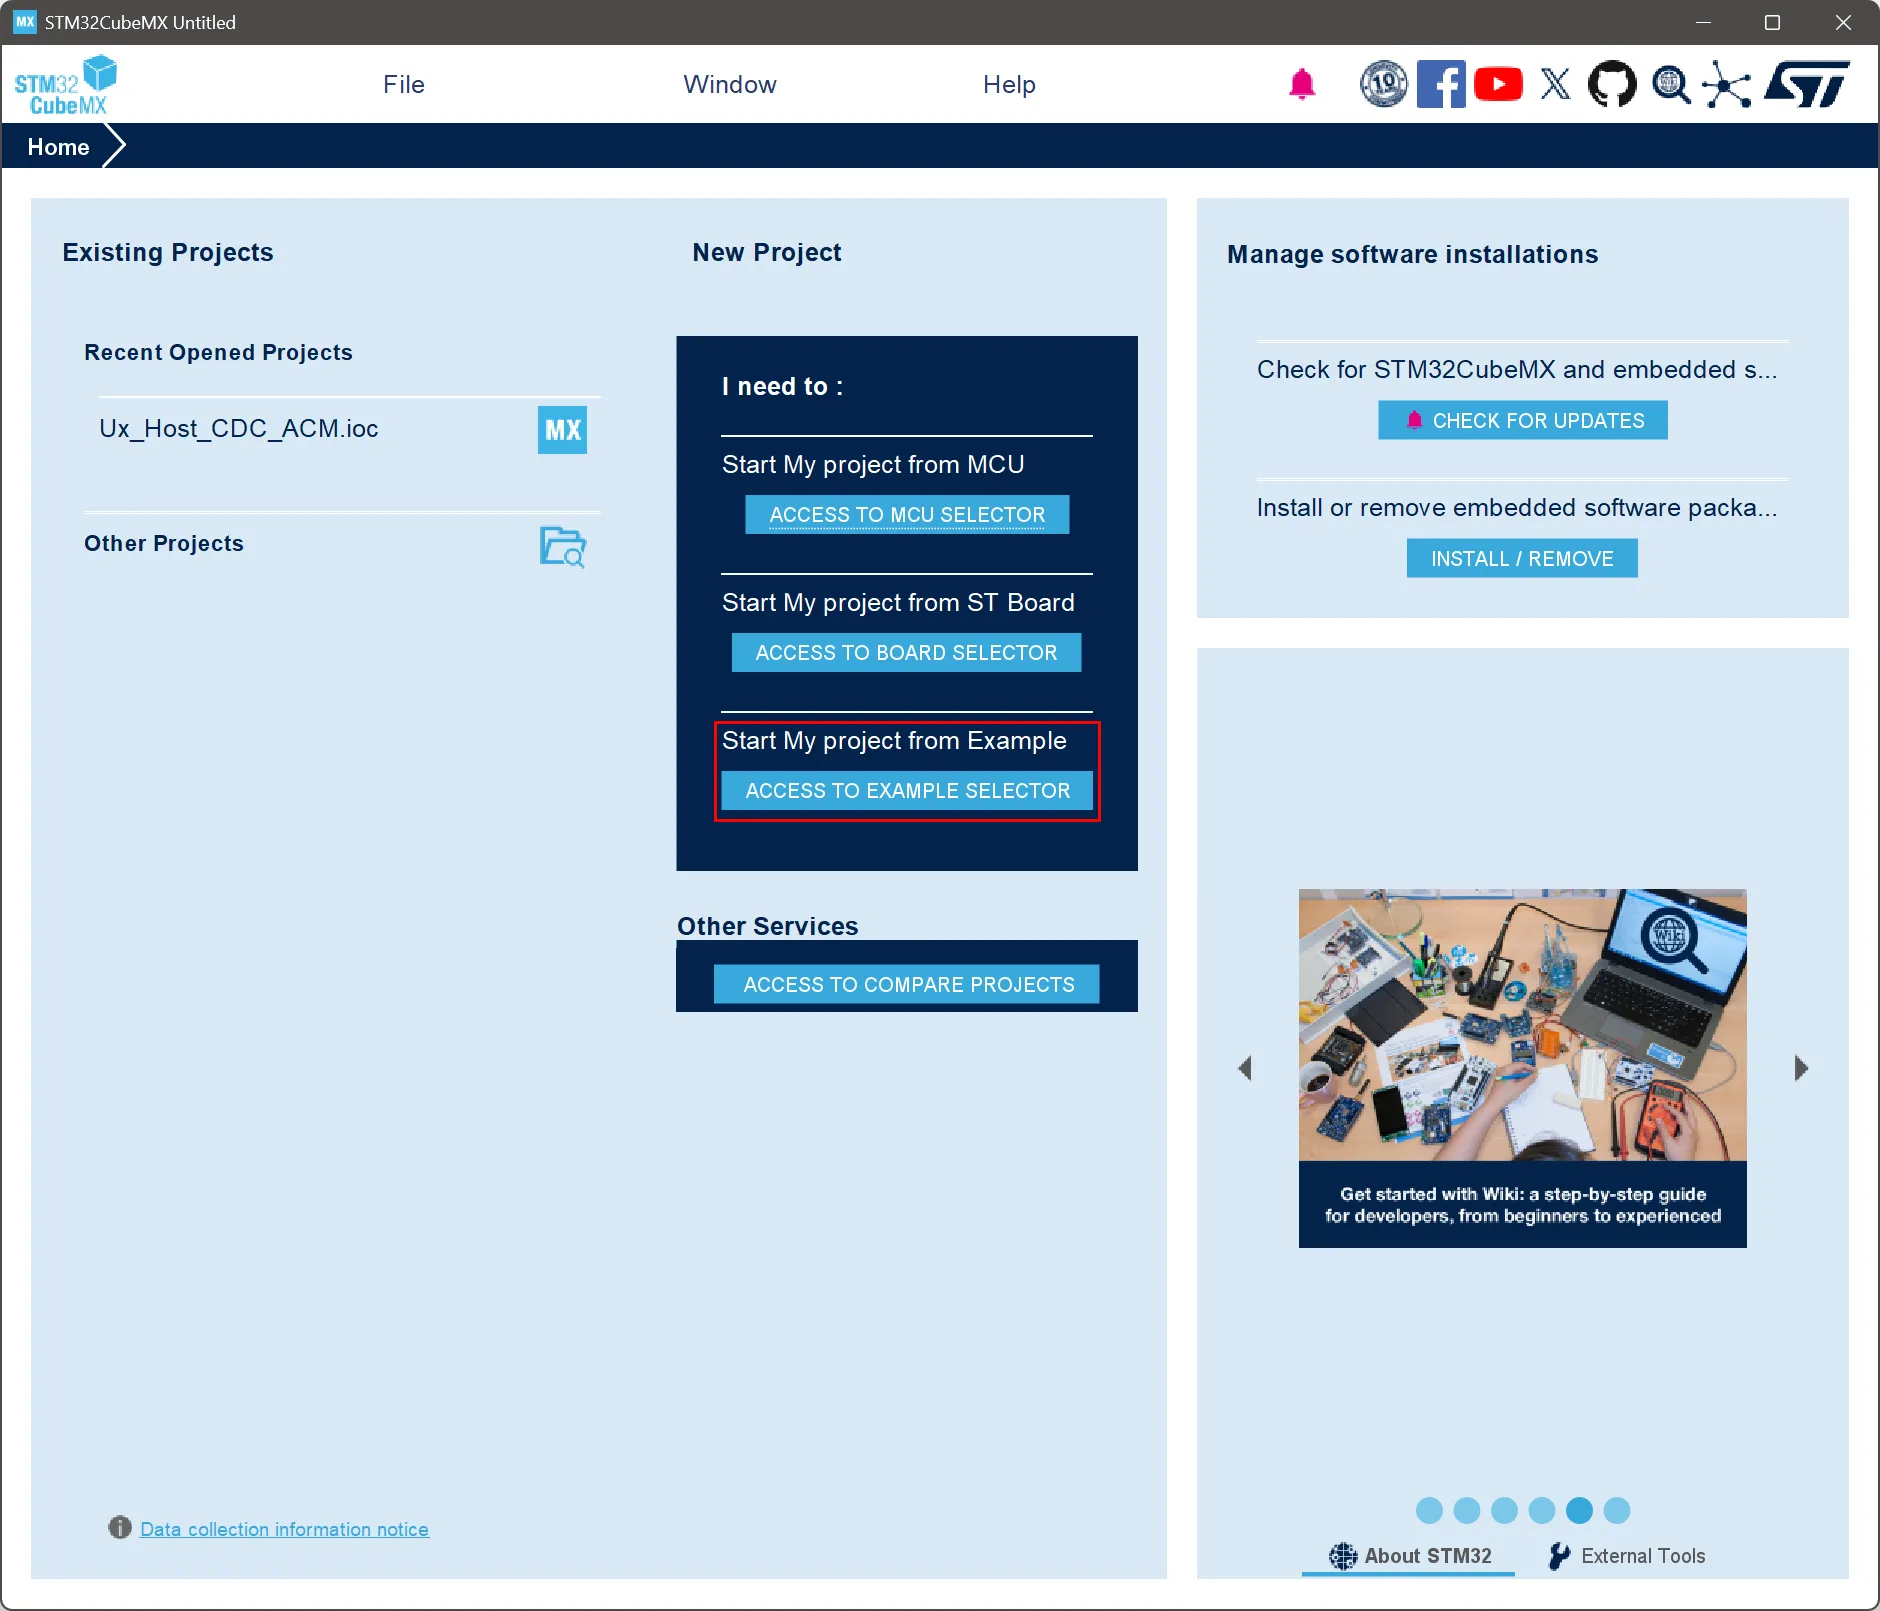
Click Access to Example Selector beneath Start My project from Example, then filter by:
- Name: HID_RTOS
- Board: STM32H7S78-DK
- STM32CubeMX Compatible
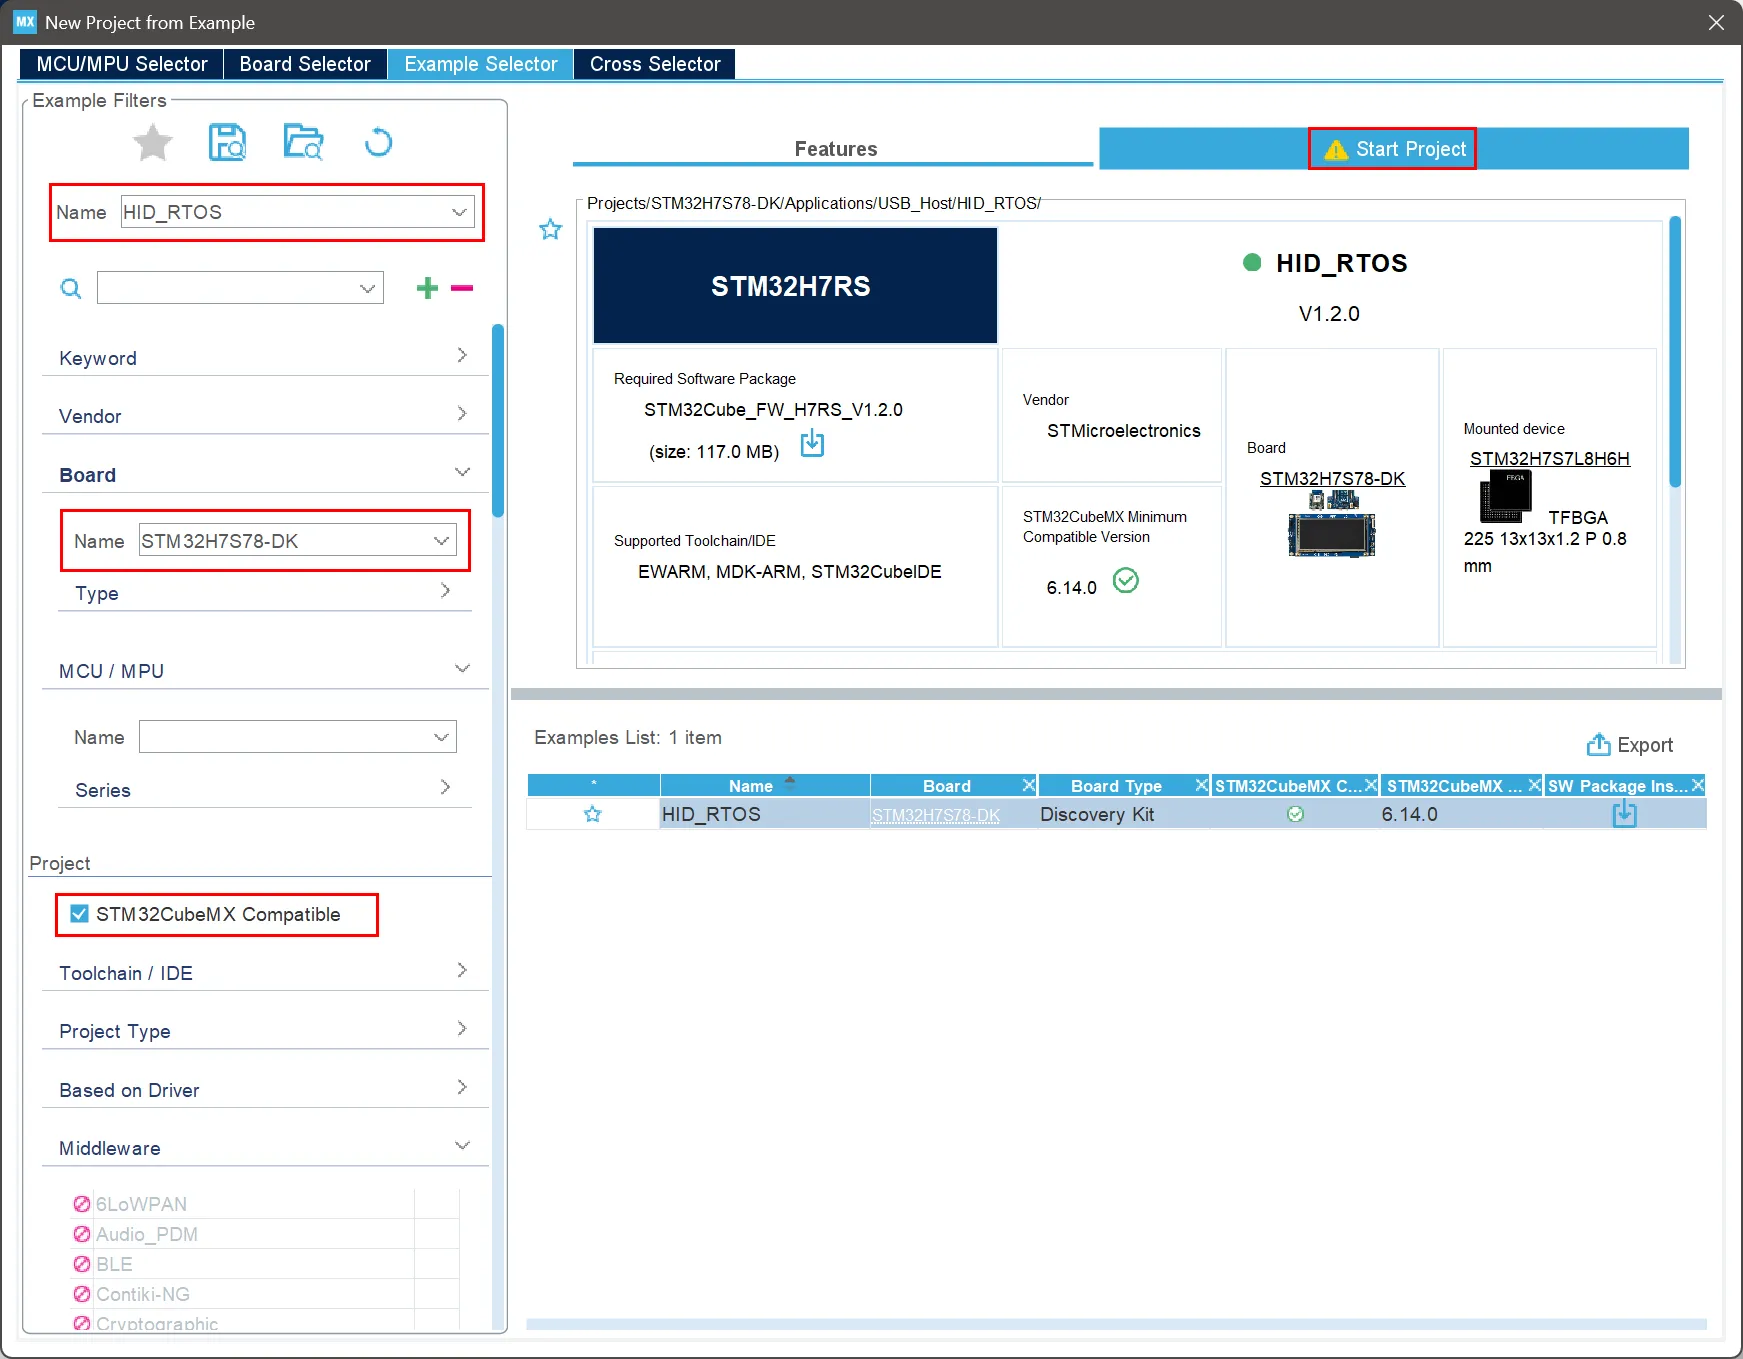
If you have a different board, or are interested in a different example, you can choose different filters, but you must check STM32CubeMX Compatible for the code generation step to work. I’ve selected HID_RTOS because it’s decidedly non-trivial (unlike the LED blinkers you’ll typically see), but can also be run with the bare minimum of hardware—your development machine, the STM32 board, a USB cable (possibly with a USB-A-to-C adapter), and spare keyboard are all you need. Once your project is selected, you can generate it by clicking Start Project in the top right corner.
In the Start Project from Example dialogue, you can select the project location and how it will open. I recommend changing the location to your source code directory, then click Install:
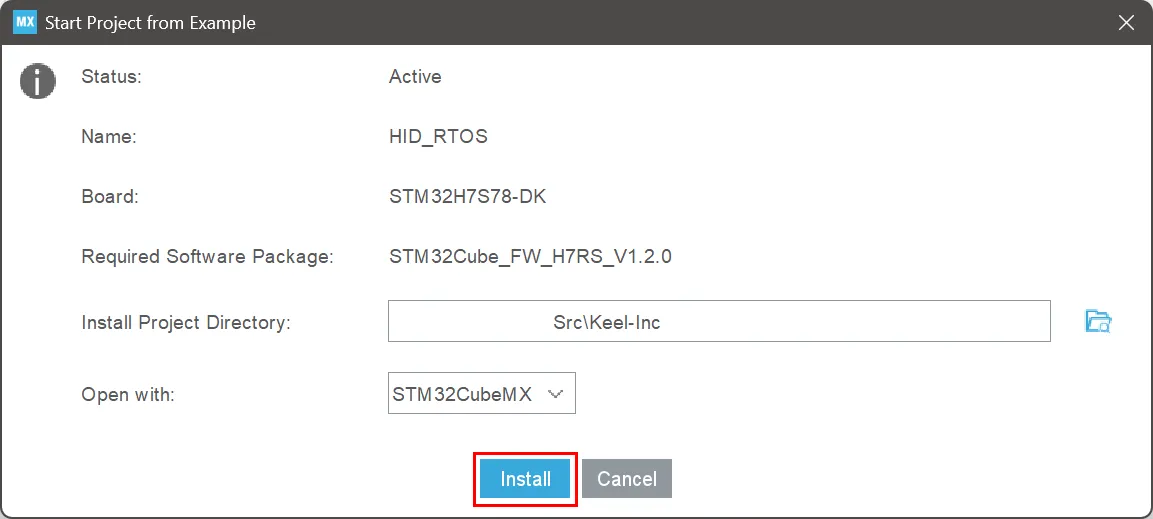
“Install” is referring to the fact that Cube will download a firmware package and some other dependencies of the new project. You will have to accept a license agreement partway through the installation, but once it’s complete, you will go to the Project Manager tab and change Toolchain / IDE to CMake, which means that the project will be generated with CMake4 files that VS Code can use to build the project.
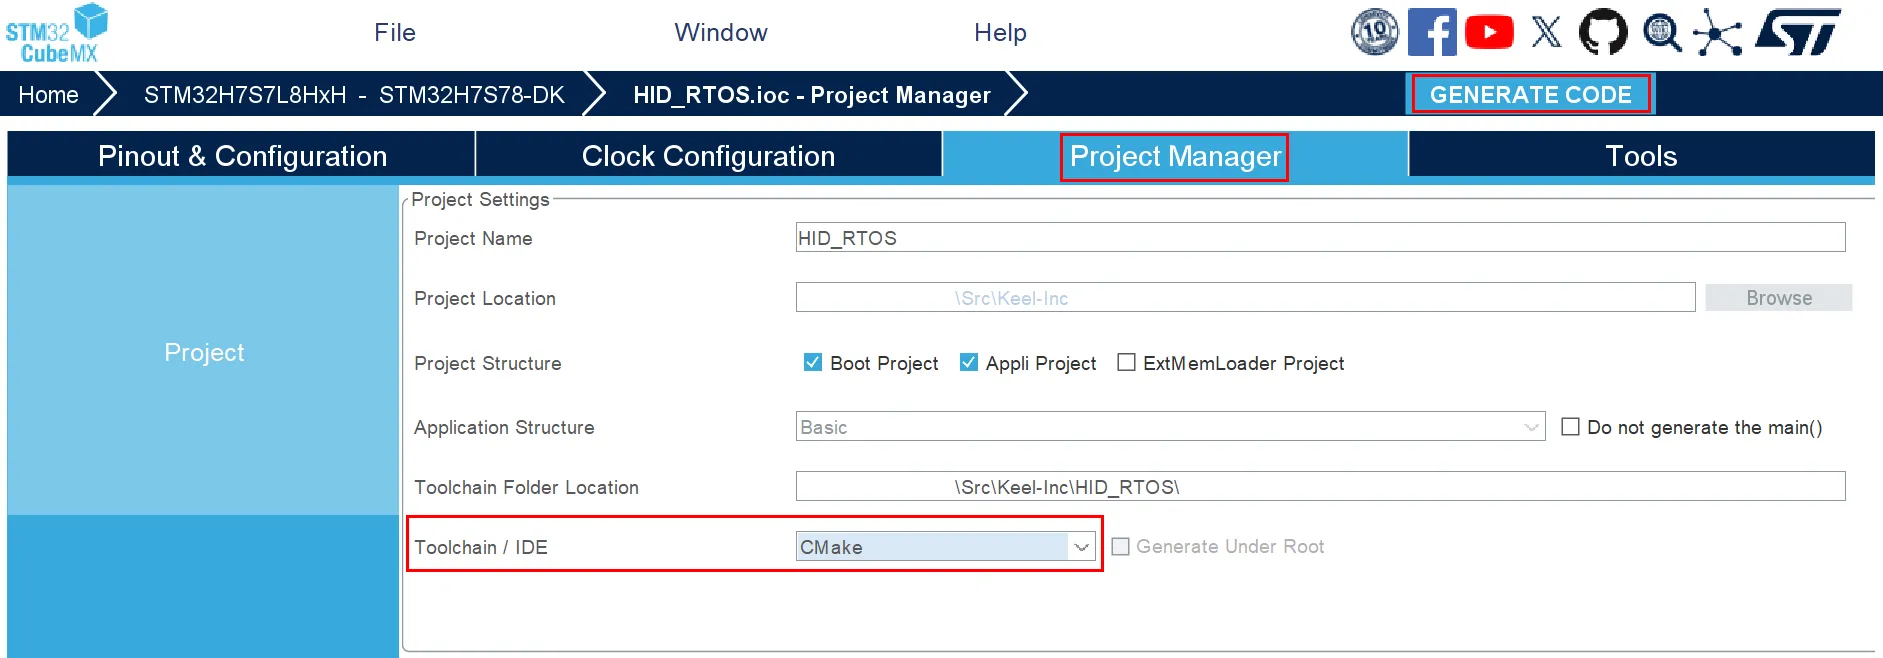
Now you are ready to generate the project by clicking the Generate Code button in the top right corner. If you want, this can be a one-time step, but the STM tooling makes re-configuring the board very easy, so it can be valuable to keep it around. For example, if you later discover that you need an additional peripheral, you can use this project to set up the pins and DMAs and anything else, then regenerate the project. So long as you’re careful with how you integrate the project’s source files into your overall project, this is maintainable, and the key files are all source-control compatible. Finally, I’ll rename to project folder to STM32Cube-VSCode:
Rename-Item "C:\Path\To\Src\HID_RTOS\" "STM32Cube-VSCode"VS Code
Building the Project
Once the project is finished generating, or if you skipped here because you already had a project started, you can open it in VS Code:
# Install the VS Code extension if you need it
code --install-extension stmicroelectronics.stm32-vscode-extension

# Open the project folder
code C:\Path\To\Src\STM32Cube-VSCode
When VS Code opens, you will be prompted to select a preset; I chose RelWithDebInfo (release configuration with debugging information):

This bit of UI can be finicky, and if you miss out on clicking it, you can run cmake --preset RelWithDebInfo instead.
Next, go to STM32 VS Code Extension > Import CMake Project.
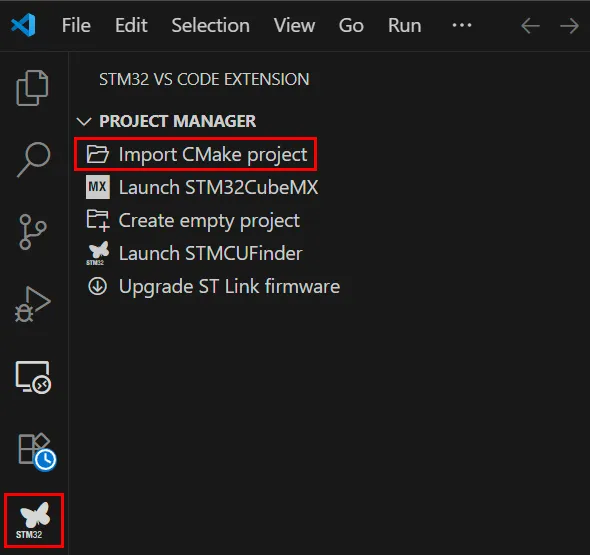
In the folder picker dialog (not shown), choose the project folder you already have open (e.g., STM32Cube-VSCode). The UX here is a bit confusing; although “import” implies moving or copying files from a source (presumably the folder you’re picking) to a destination (presumably the workspace directory), what this button actually does is create a .vscode folder with some useful json files—most notably launch.json and tasks.json—in the folder you pick. So you want to choose the STM32 Cube project directory. In the repository accompanying this article, I have committed the four JSON files, but typically I would git-ignore .vscode (so that individual developers can customize their launch and task settings) and use the import workflow to recreate the files on a fresh checkout (or, more likely, some kind of automation of that process).

After the import, there will be a Build button on the bottom status bar:
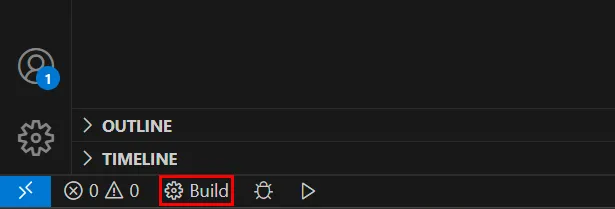
You can click Build to build the project, or do it on the command line:
cmake --build build/RelWithDebInfo

# To "reset" your cmake configuration
Remove-Item -Recurse -Force build,Appli/build,Boot/build
cmake --preset RelWithDebInfo
Board Setup
Now that you’ve built your project, you’d like to run it, but first you need to get the board powered-on and connected to your development machine. My board is an STM32H7S78-DK with three USB-C ports (PWR_STATUS, USB1, and USB2). The PWR_STATUS port is used for supplying the board with power and debugging (as we’ll see later).
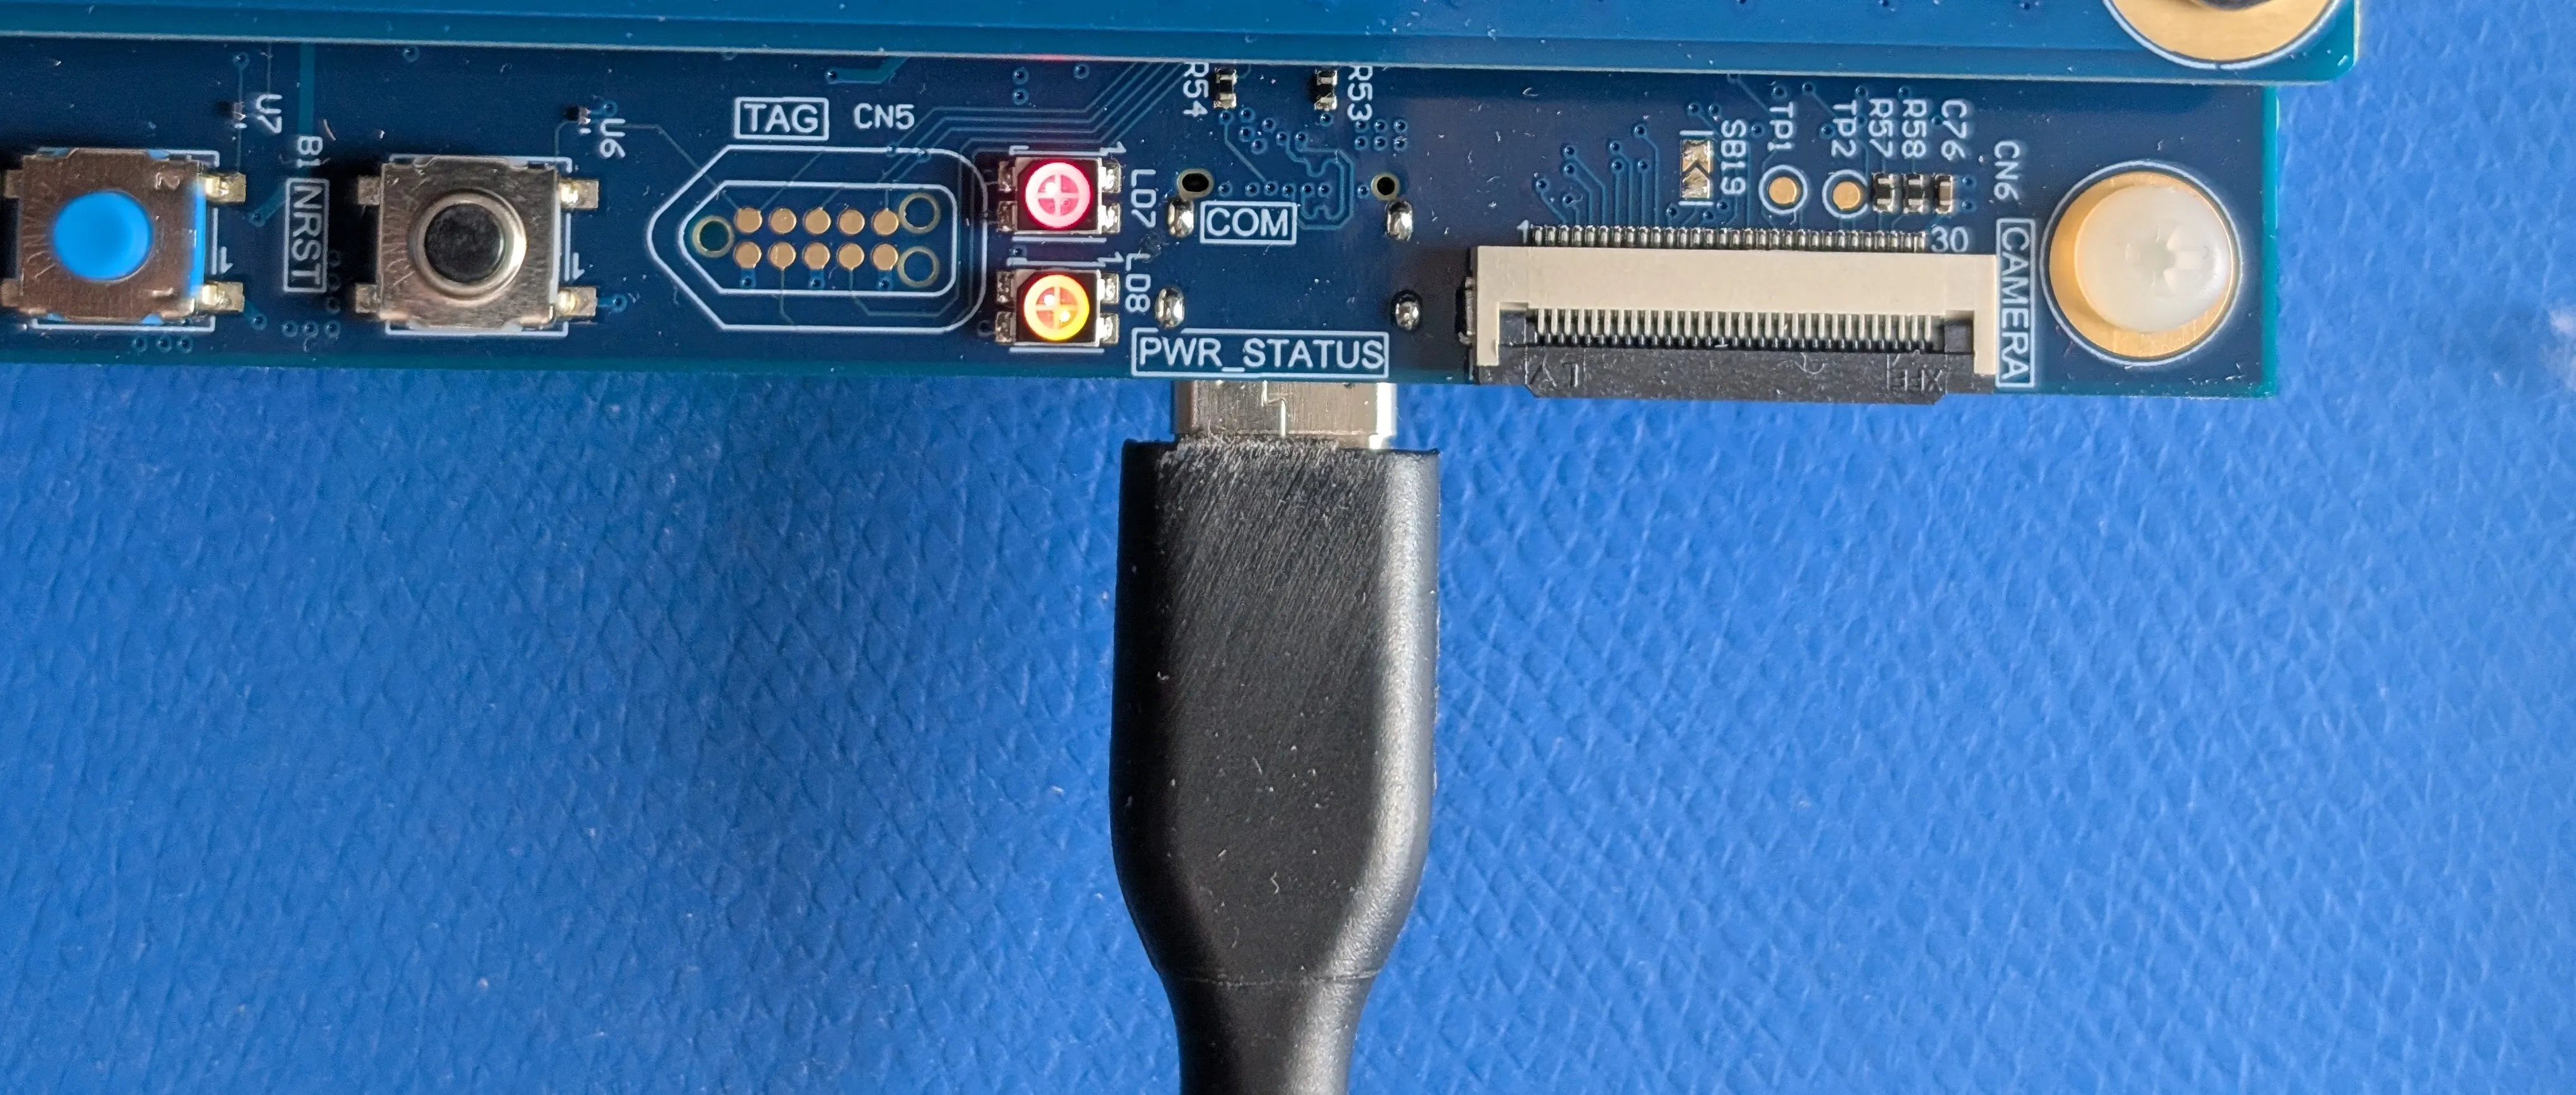
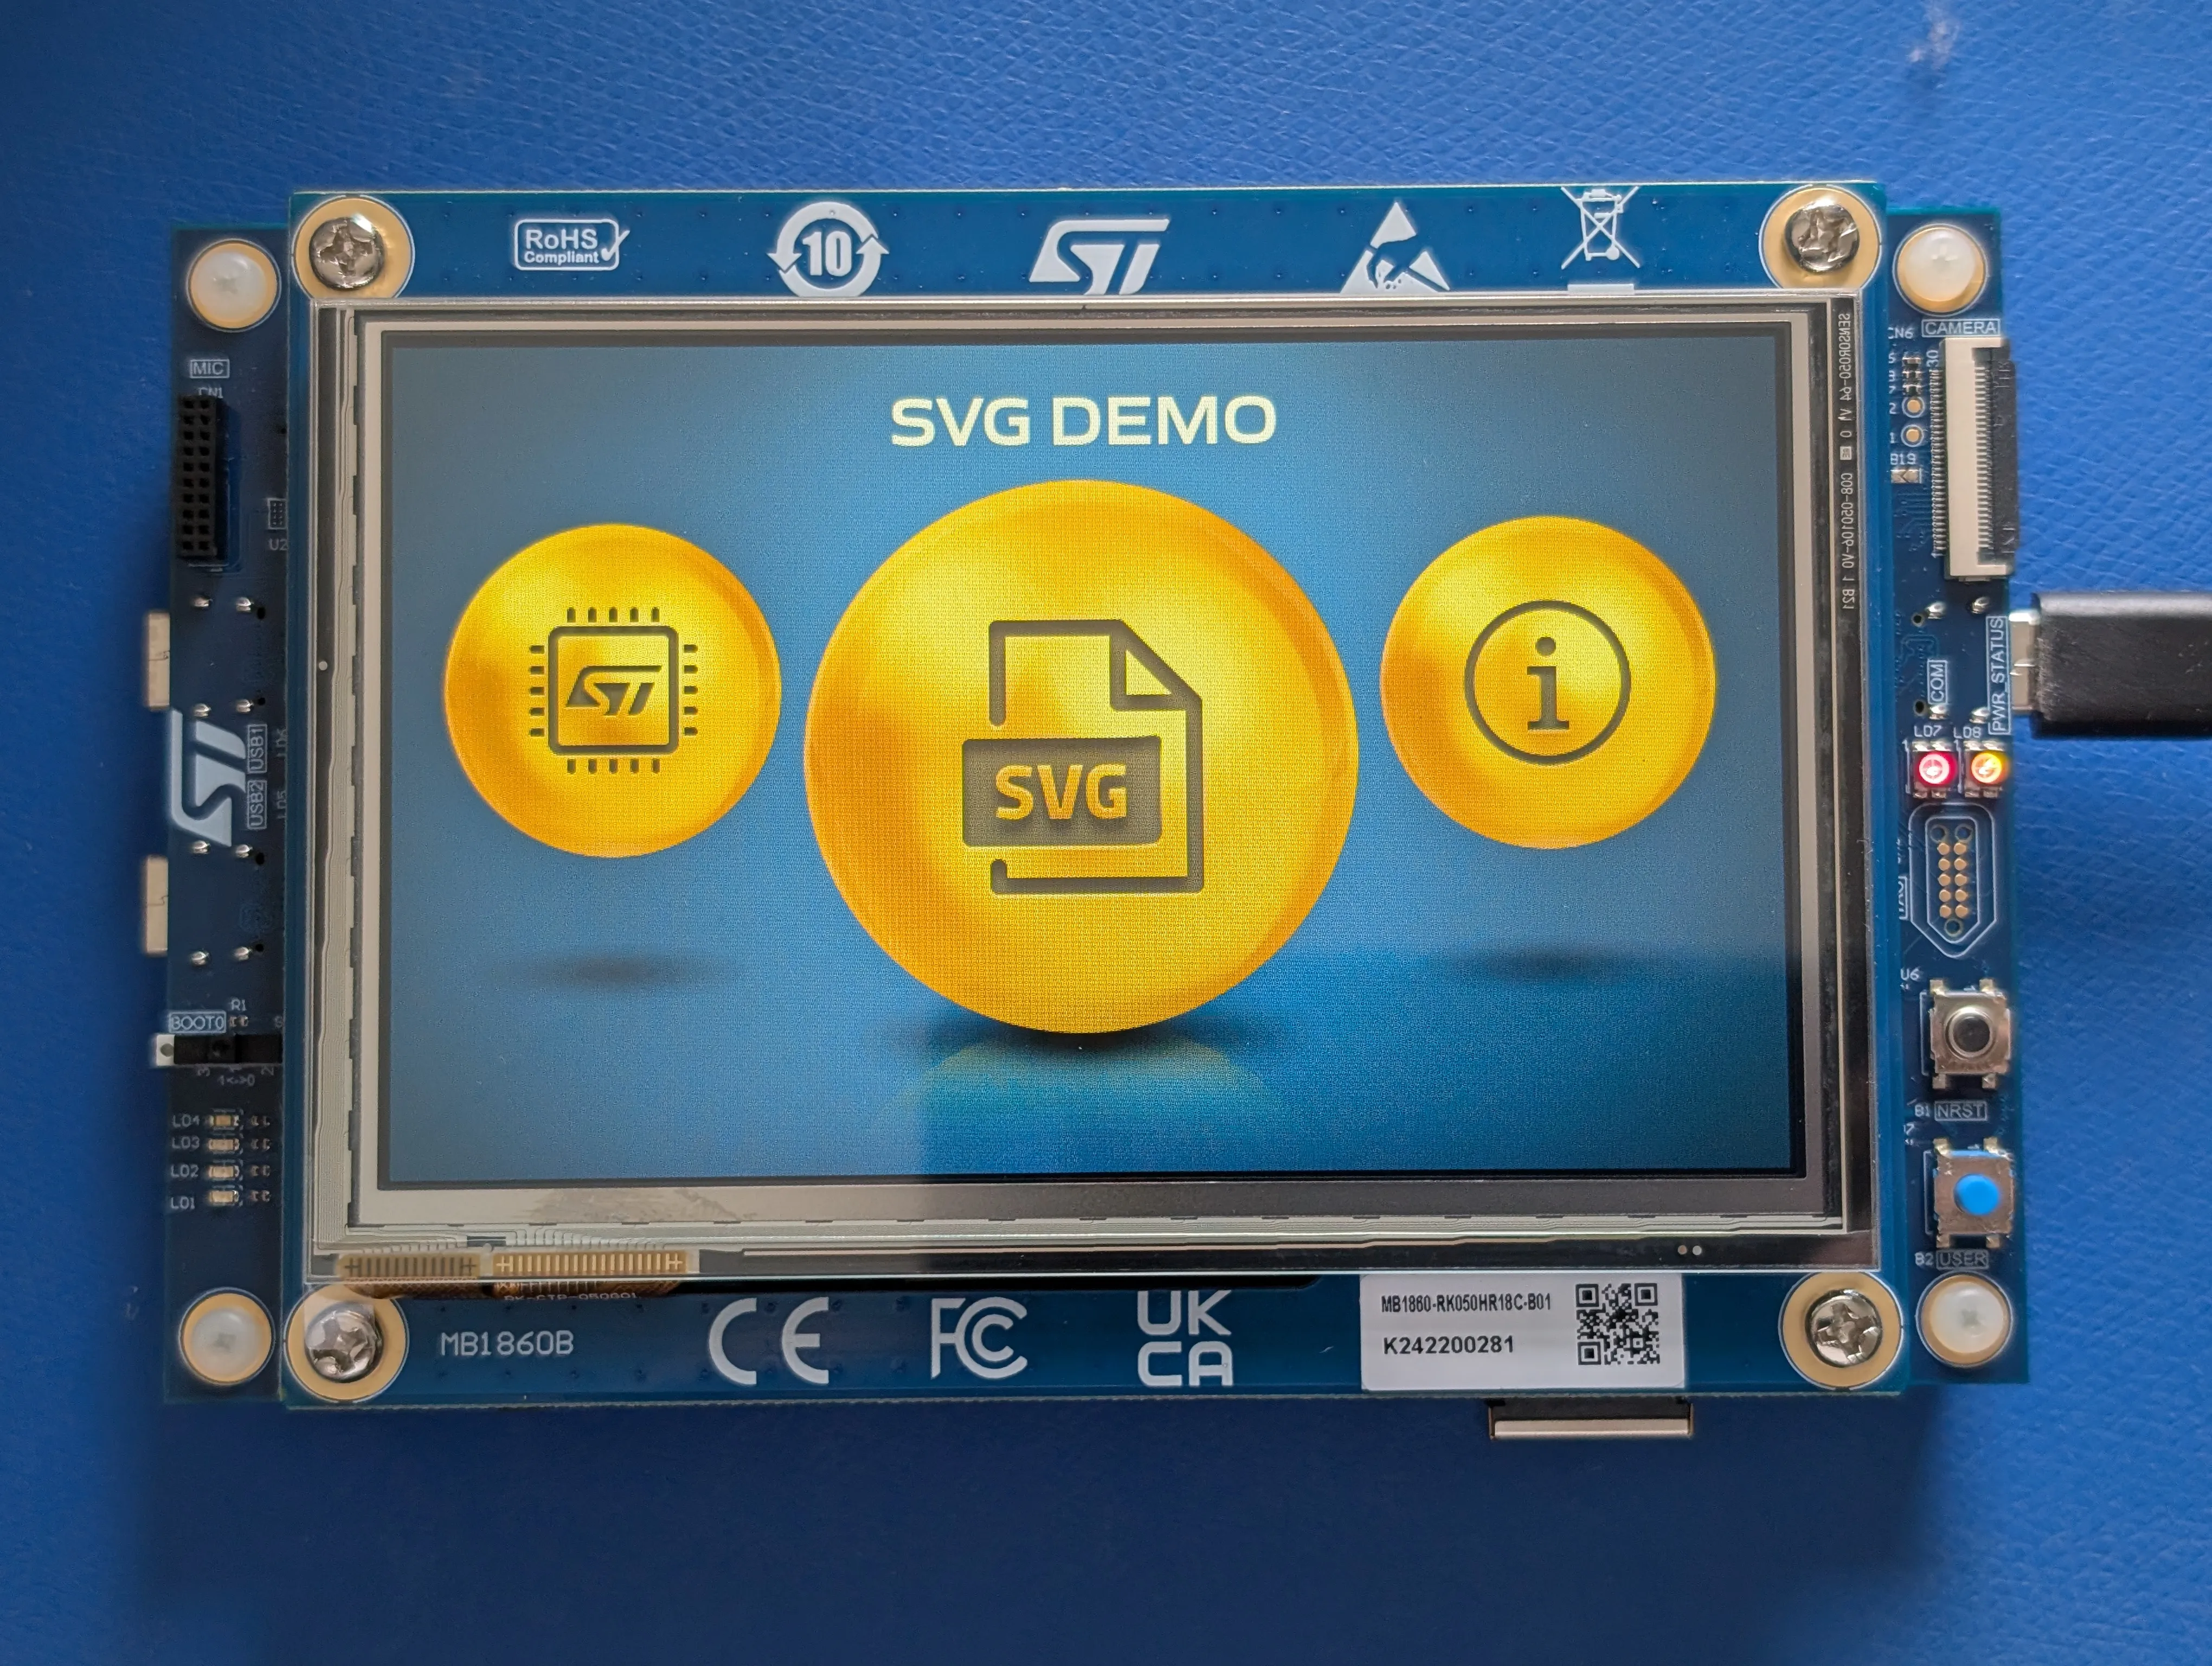
Plug a USB-C cable into PWR_STATUS (above). My board came with a pre-installed demo application that displays an image on the attached LCD screen. This demo started as soon as the board was powered on (below), but your board might not have such a demo, or you might already have overwritten in.
If everything is working properly, you should see an “ST-Link Debug” device attached to your development machine:
Get-PnpDevice -PresentOnly | Where-Object { $_.FriendlyName -match 'ST-Link|STLink|STM' }`:Status Class FriendlyName InstanceId
------ ----- ------------ ----------
OK USBDevice ST-Link Debug USB\VID_0483&P…If nothing shows up, you can make the search broader, or run Device Manager (devmgmt.msc) and look under Universal Serial Bus devices or Ports (COM & LPT).
Running the Project
To run or debug the project means putting your program on the board5 and then letting it run, with a debugger attached in the latter case (more on that later). To run your project using VS Code’s UI, switch to the Run and Debug side-menu and click the green Play icon with Debug external memory - ST-Link selected in the drop-down:

When I clicked this the first time, I got an error:
Error in initializing ST-LINK device.
Reason: ST-LINK firmware upgrade required. Please upgrade the ST-LINK firmware using the upgrade tool.
Following those instructions, I downloaded STSW-LINK007, then ran it:
mkdir C:\ST\STSW-LINK007
unzip $HOME\Downloads\stsw-link007-v3-16-9.zip
mv $HOME\Downloads\stsw-link007-v3-16-9\stsw-link007\Windows\* C:\ST\STSW-LINK007
& C:\ST\STSW-LINK007\ST-LinkUpgrade.exe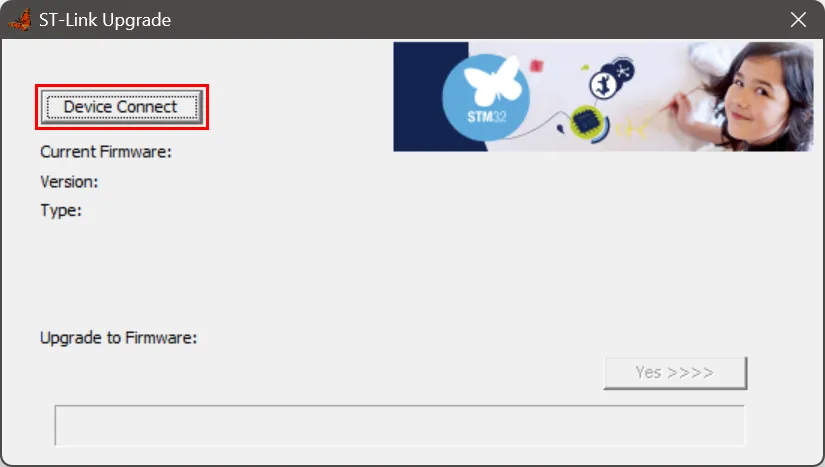
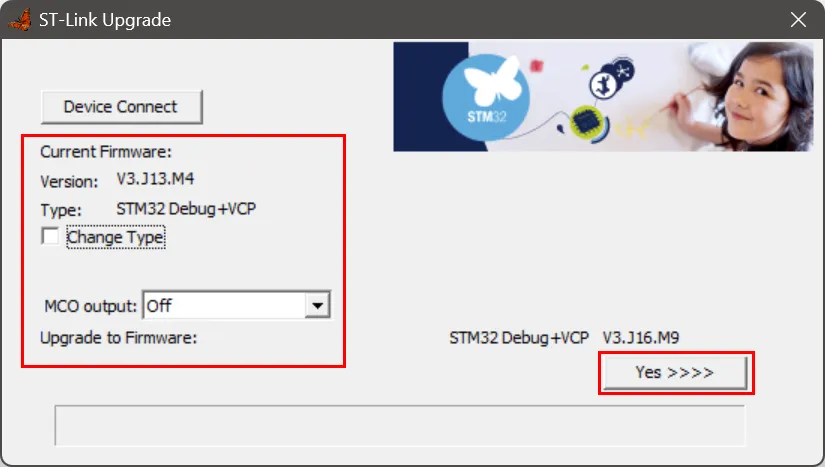
In the ST-Link Upgrade utility, I clicked Device Connect (above) then Yes >>>> (below), accepting all defaults
Program stopped, probably due to a reset and/or halt issued by debugger
2
STM32 Successfully completed reset operation (System reset)
Trying to halt core...
Note: automatically using hardware breakpoints for read-only addresses.

Temporary breakpoint 1.1, main () at (...)/STM32Cube-VSCode/Boot/Src/main.c:82
82   MPU_Config();
After the upgrade finished, flashing the board worked, which I could tell from this text in the DEBUG CONSOLE (above) and seeing the application paused in the main function (below).
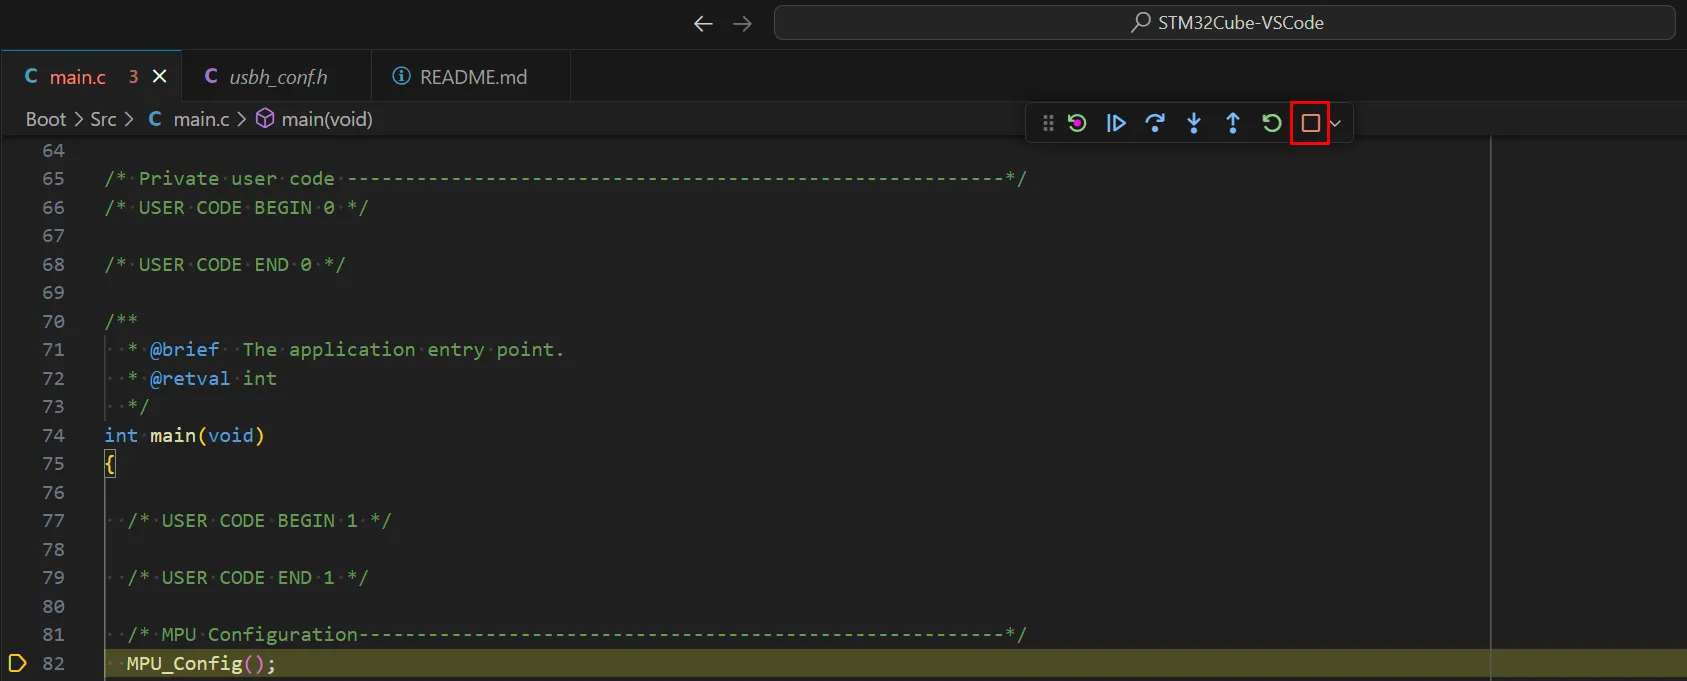
From here we could start debugging, but we’re not interested in that, so click the red Stop button to stop the debugger and let the program run. Other ways to start the program are to use the command palette (Ctrl+Shift+P) and type Debug: Start Without Debugging, or press Ctrl+F5.
My example project, recall, was “HID_RTOS”. “HID” stands for “Human Interface Device,” which is a USB device that lets a human interact with a computer (e.g., a mouse or keyboard) and “RTOS” stands for “Real-Time Operating System,” which is a simpler, more responsive operating system (than, say, Windows or Linux) which is designed for embedded devices. Putting the two together, the project is an RTOS (FreeRTOS) running an application that acts as the USB Host (this isn’t obvious from the name, but we’ll see in a bit that it’s true) for a human interface USB Device (such as a keyboard). This is a demonstration project, so all the application does is print a log of the HID events through the debug connection. Accordingly, I now see a USB Serial COM Port:
$device = Get-PnpDevice -PresentOnly | Where-Object { $_.FriendlyName -match 'USB Serial Device' }Status Class FriendlyName InstanceId
------ ----- ------------ ----------
OK Ports USB Serial Device (COM3) USB\VID_0483&P…In order to see the log printed by the application, I need to connect to the COM port, which I can do with the command-line version of PuTTY (plink). First, I’ll install it:
winget install -e --id PuTTY.PuTTY
& "C:\Program Files\PuTTY\plink" --help
Now I can connect to the COM port:
$device = Get-PnpDevice -PresentOnly | `
    Where-Object { $_.FriendlyName -match 'USB Serial Device' } | `
    Select-Object -First 1
$comPort = if ($device -and $device.FriendlyName -match '\((COM\d+)\)') `
    { $matches[1] `} else { $null }
plink -serial $comPort -sercfg 115200,8,n,1,N
Now we can see that the application is, indeed, a USB Host, and that it is waiting for a connection:
 **** USB OTG HS Host ****

USB Host library started.

Starting HID Application
Connect your HID Device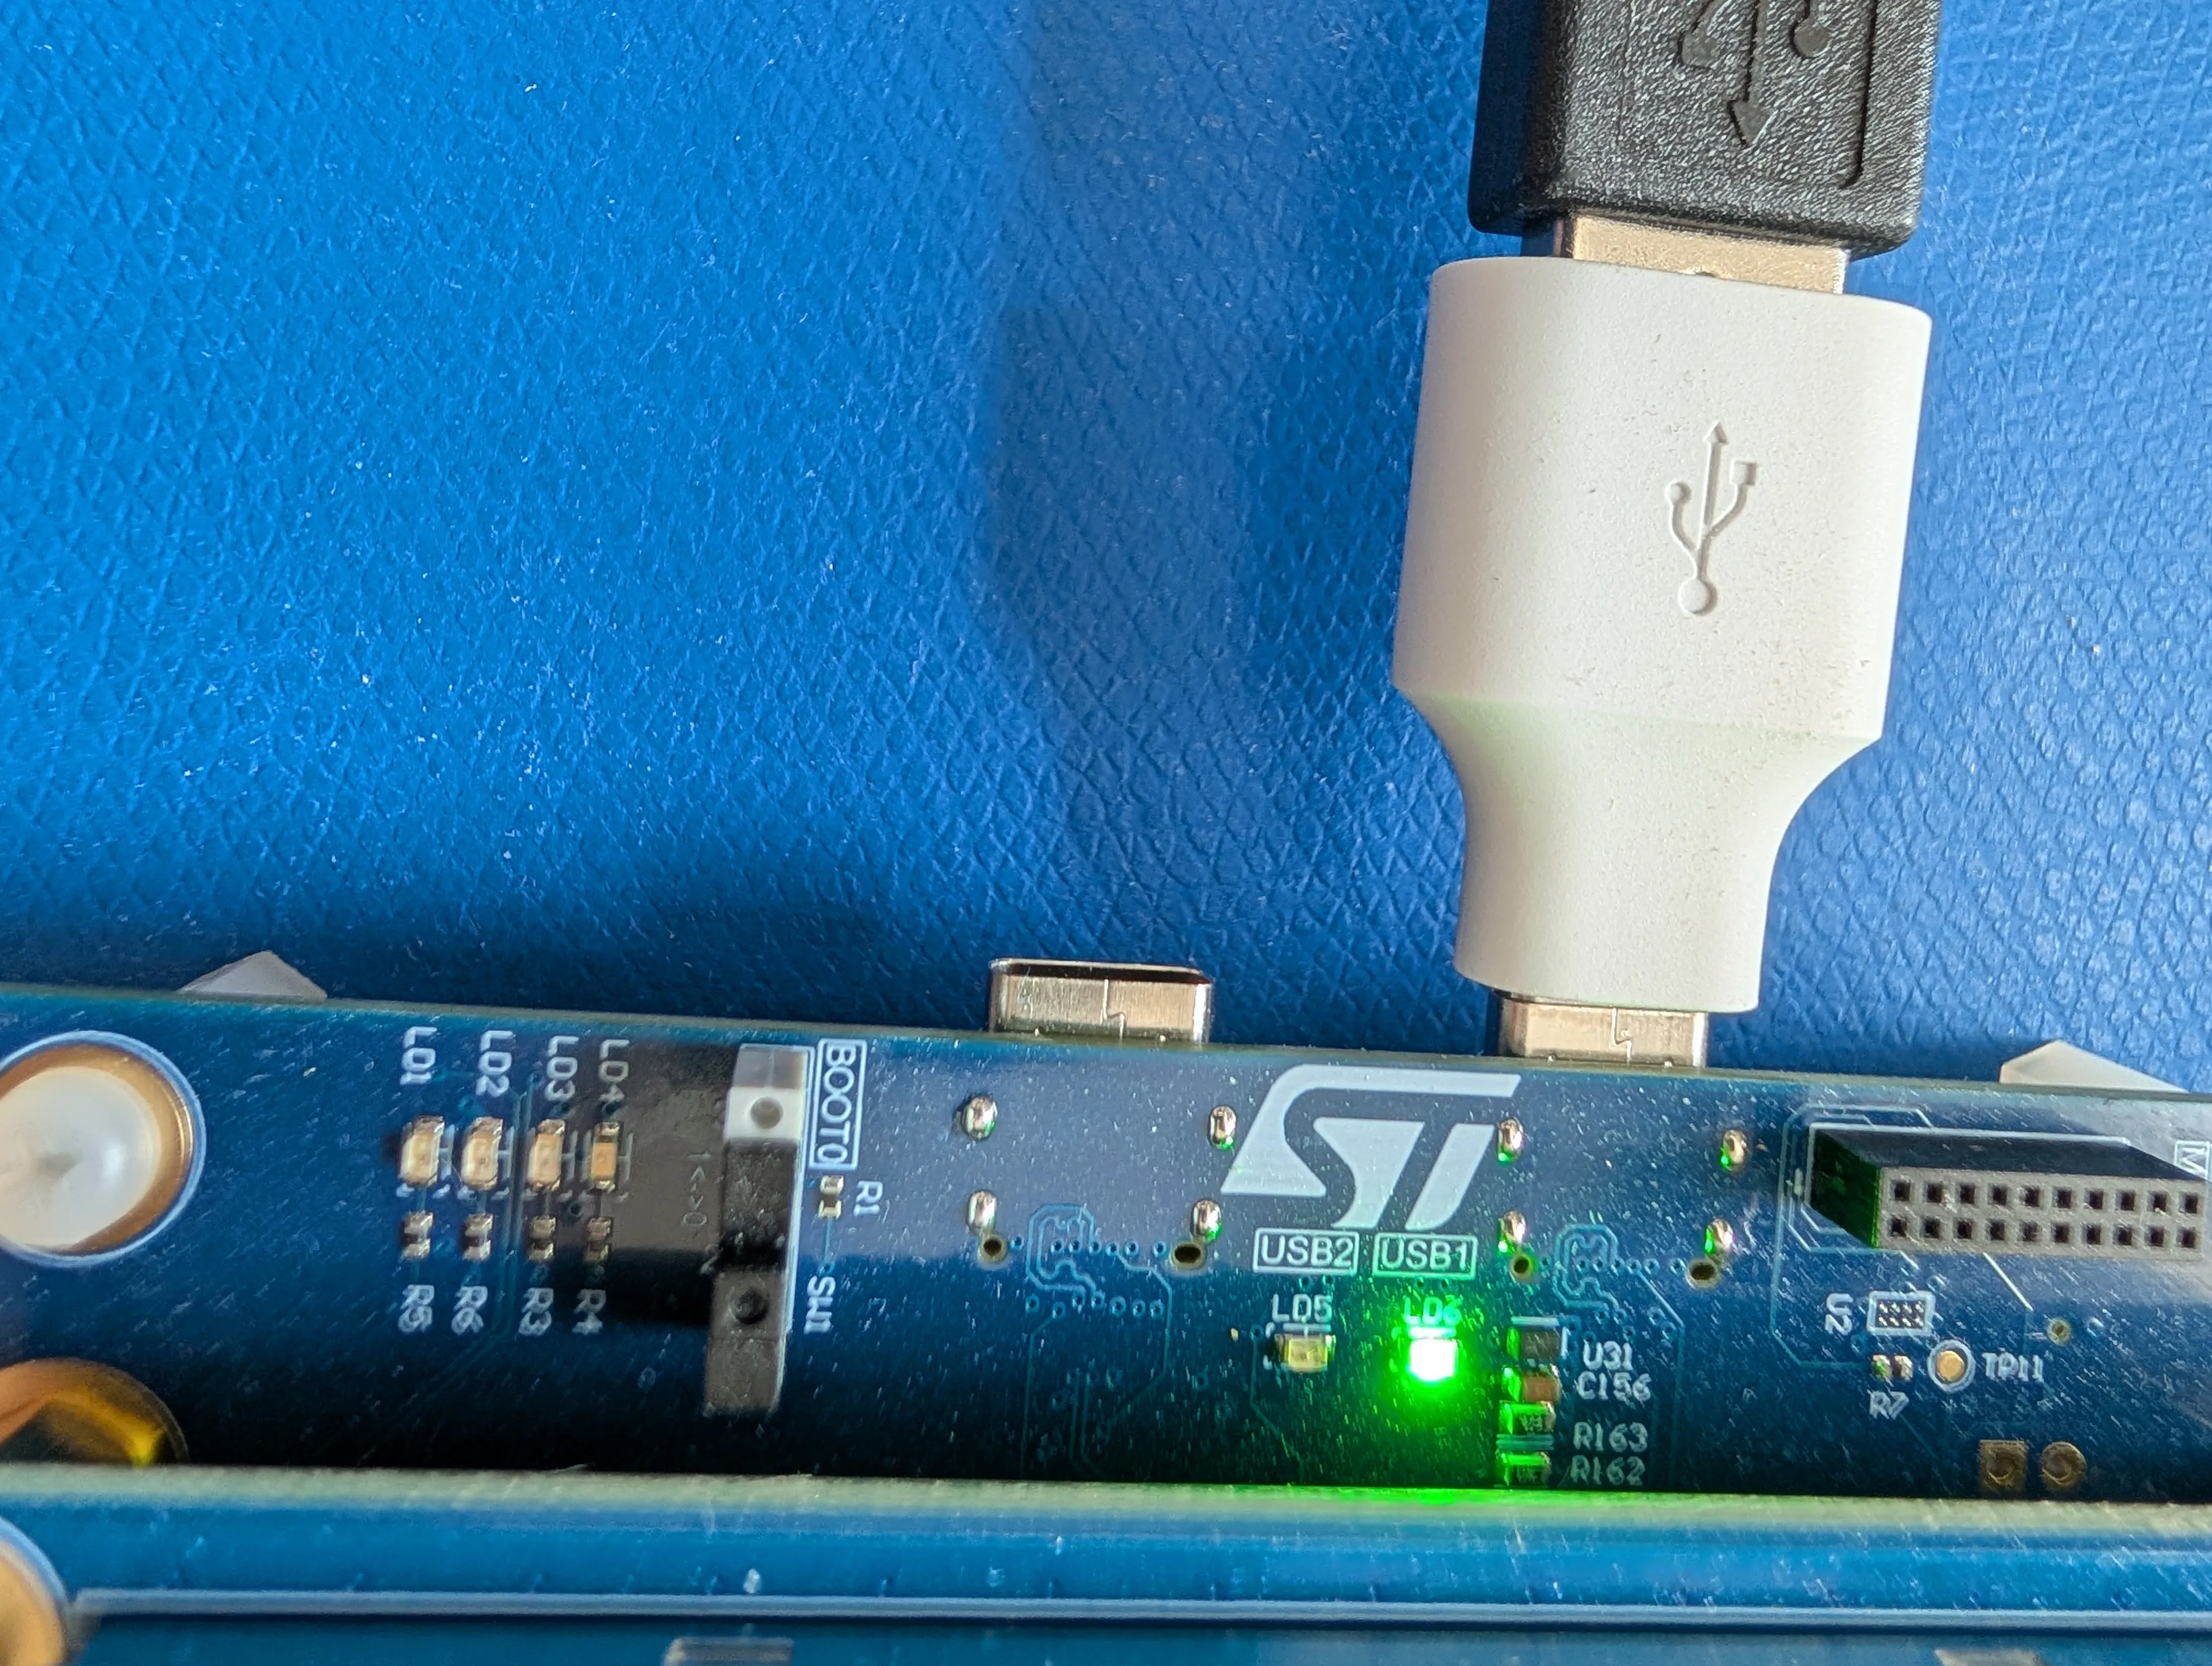
I will plug in a spare keyboard using a USB-A-to-C adapter (above), and now I see more output, including a poor developer’s immortalized typo:
USB Device Connected
USB Device Reset Completed
PID: 30ch
VID: e6ah
Address (#1) assigned.
Manufacturer : TrulyErgonomic.com
Product : Truly Ergonomic Computer Keyboard
Serial Number : N/A
Enumeration done.
This device has only 1 configuration.
Default configuration set.
Device remote wakeup enabled
Switching to Interface (#0)
Class    : 3h
SubClass : 1h
Protocol : 1h
KeyBoard device found!
HID class started.
Use Keyboard to tape characters:
Now, when I type on my keyboard, I see the characters relayed to my terminal:
H
e
l
l
o

W
o
r
l
d
!
Debugging the Project
Finally, we will return to the debugger and step through the code (the debugger can be launched with F5). Here’s the starting screen again:
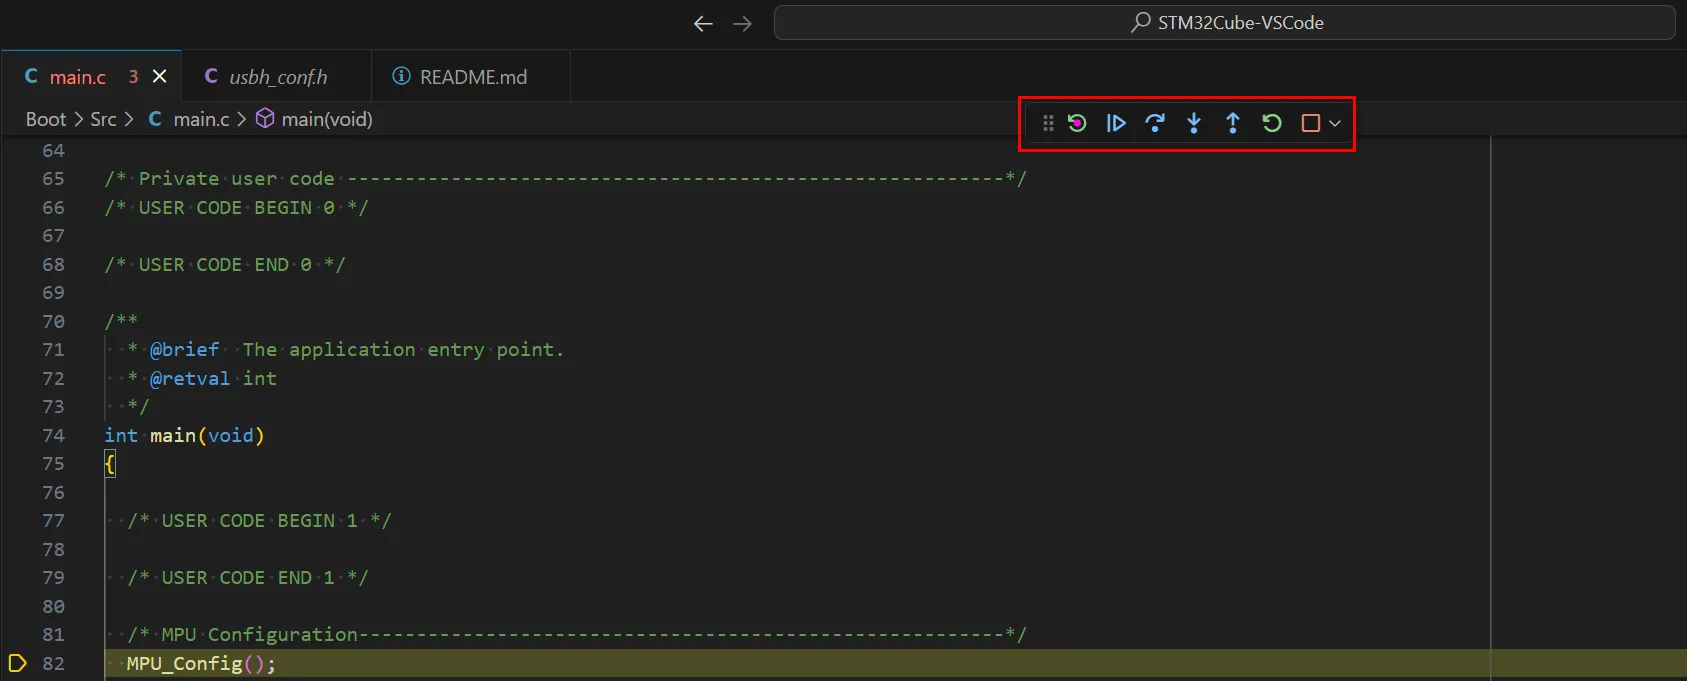
From left to right, the buttons are:
- Reset device: Restart the program from the first instruction without rebuilding or re-flashing.
- Continue: Run the code until the next breakpoint (or indefinitely if there are no breakpoints set).
- Step over: Step over the function (i.e., run the entire function and stop when it completes), or execute the current instruction if it’s not a function call.
- Step into: Step into the function. If the current line is not a function, this is the same as Step over.
- Step out: Run to the end of the current function, then return from the function, then pause.
- Restart: Restart the program from the first instruction after rebuilding and re-flashing.
Here’s a subset of the project’s structure, showing the files we’ll visit during debugging:
STM32Cube-VSCode/
├── Boot/
│   ├── Src/
│   │   ├── main.c
│   │   └── (...)
│   └── (...)
├── Appli/
│   ├── Src/
│   │   ├── main.c
│   │   ├── usb_host.c
│   │   └── (...)
│   └── (...)
├── Drivers/
│   └── (...)
└── Middlewares/
    ├── ST/
    │   ├── STM32_ExtMem_Manager/
    │   │   ├── boot/
    │   │   │   ├── stm32_boot_xip.c
    │   │   │   └── (...)
    │   │   └── (...)
    │   └── (...)
    └── (...)
Note that there are two top-level folders (Boot and Appli), each with their own main.c. That’s because this project includes a bootloader (Boot) along with the HID_RTOS application proper (Appli). I won’t cover bootloaders here, but they are one way of giving your program the ability to upgrade itself with a newer version6.
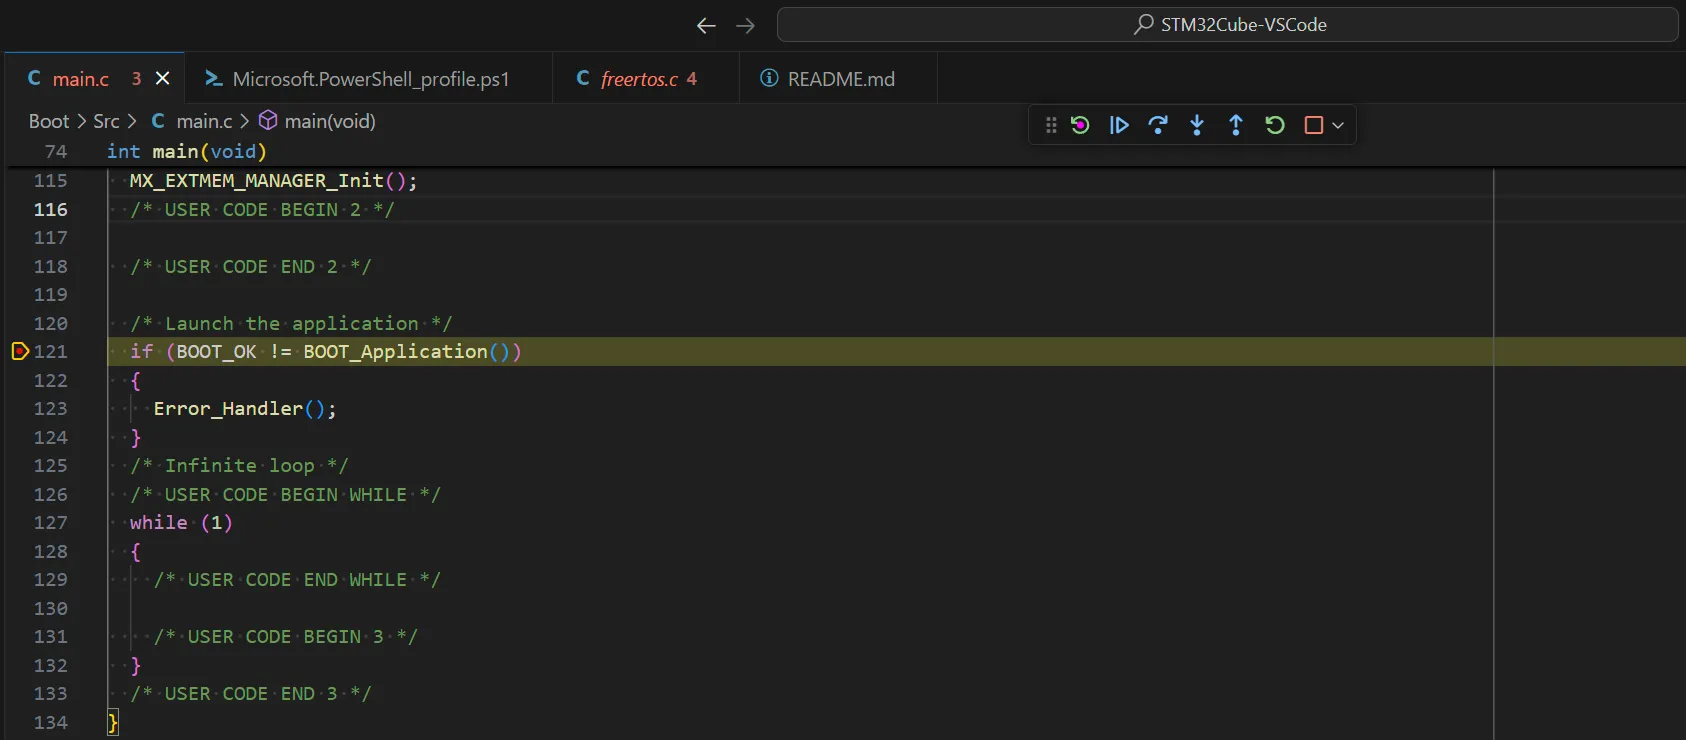
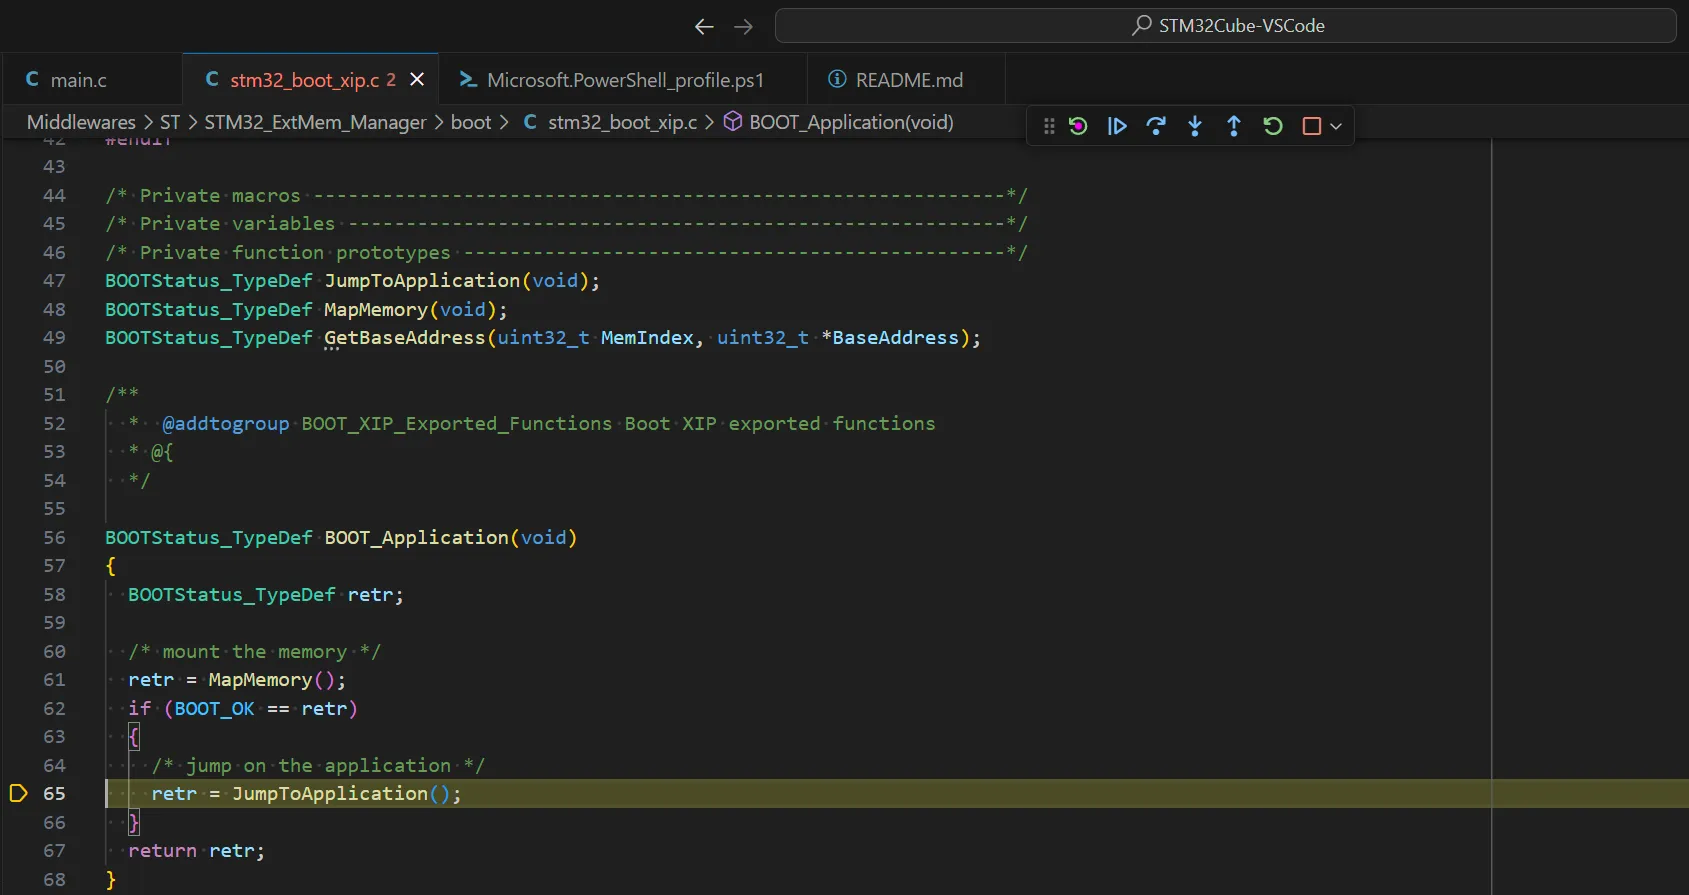
We’re starting off in Boot\Src\main.c, and we’ll set a breakpoint on line 121 by clicking the margin on the left side of the line number (where the red dot appears in the screenshot above). If you don’t see line numbers, you’ll need to enable them in the user settings7. If we step into the function (F11), we’ll end up in Middlewares\ST\STM32_ExtMem_Manager\boot\stm32_boot_xip.c. Let’s set a breakpoint on JumpToApplication() (line 65, below) and run to it (F5).
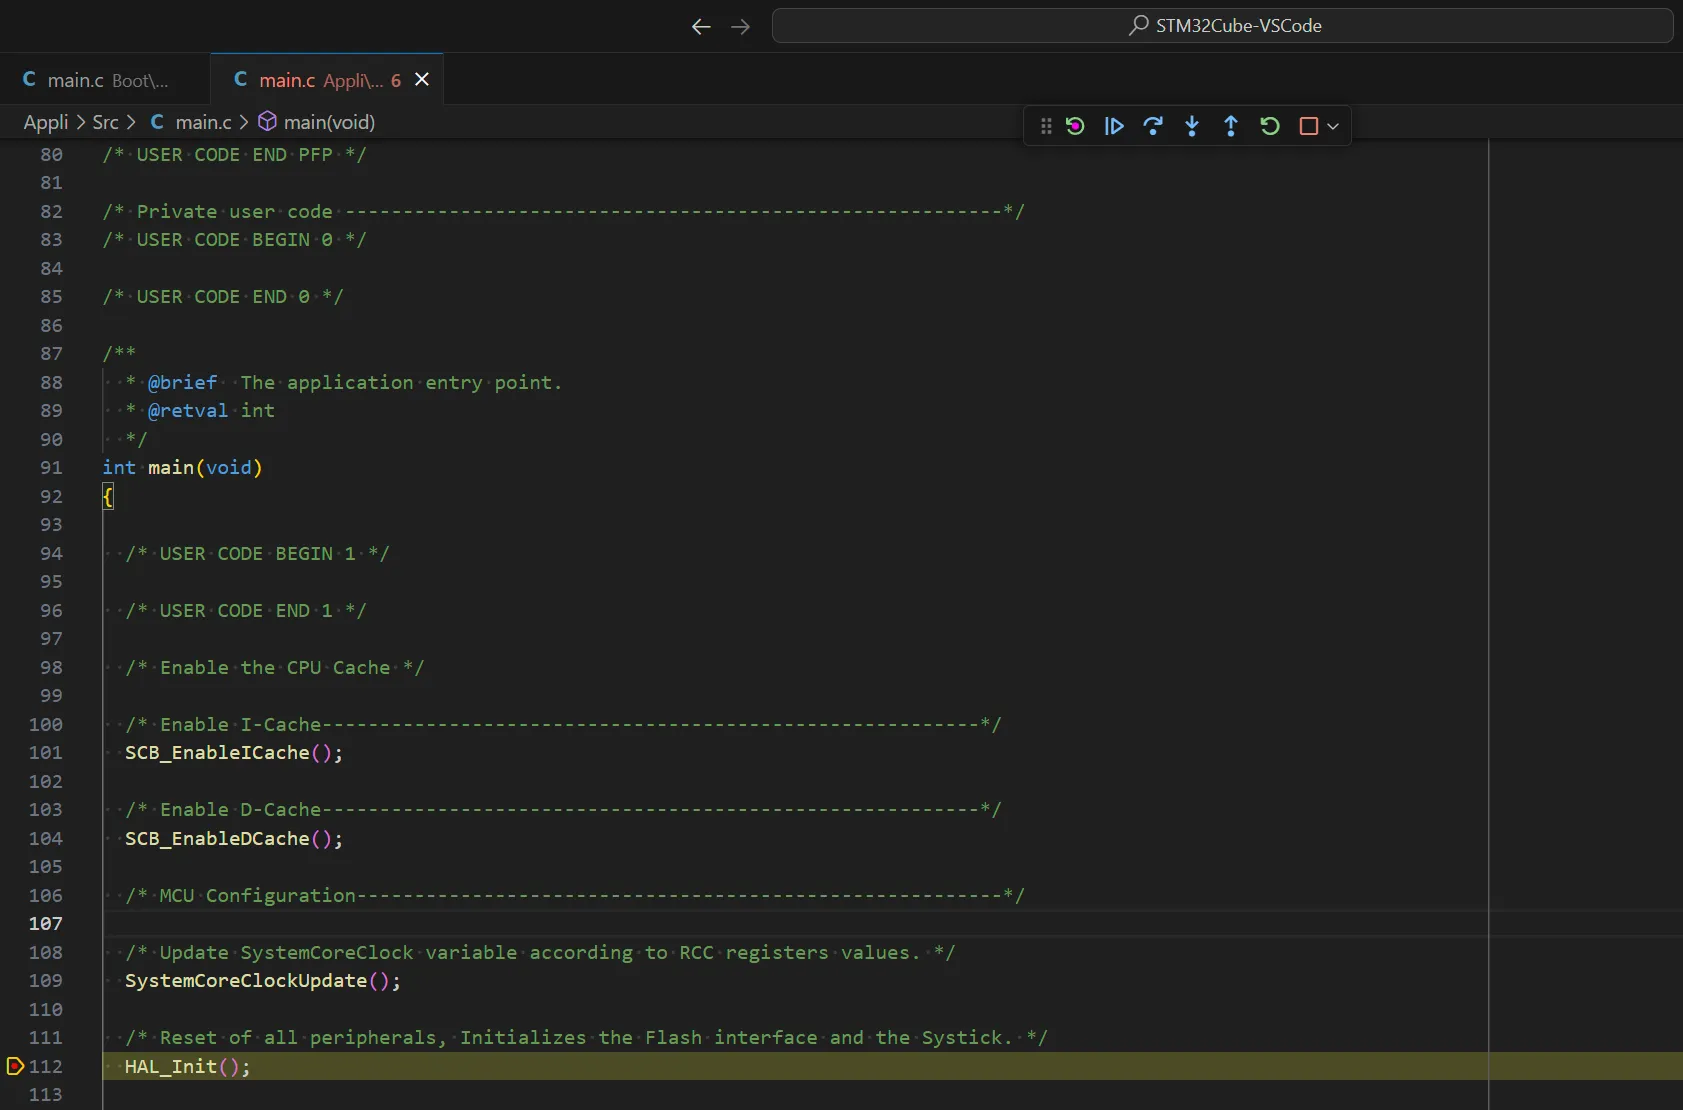
Rather than tracing the code function-call-by-function-call, we can jump ahead to where we expect to end up: the application’s main function. So we’ll open up Appli\Src\main.c and set a breakpoint on line 112 (HAL_Init()), then press F5 to run there:
Now we’ve confirmed that the bootloader has successfully loaded and begun the main application. Let’s see how key presses are handled. We’ll go to Appli\Src\usb_host.c and set a breakpoint on line 264, inside HID_KEYBRD_App(). If we press a key, we’ll see it hit:
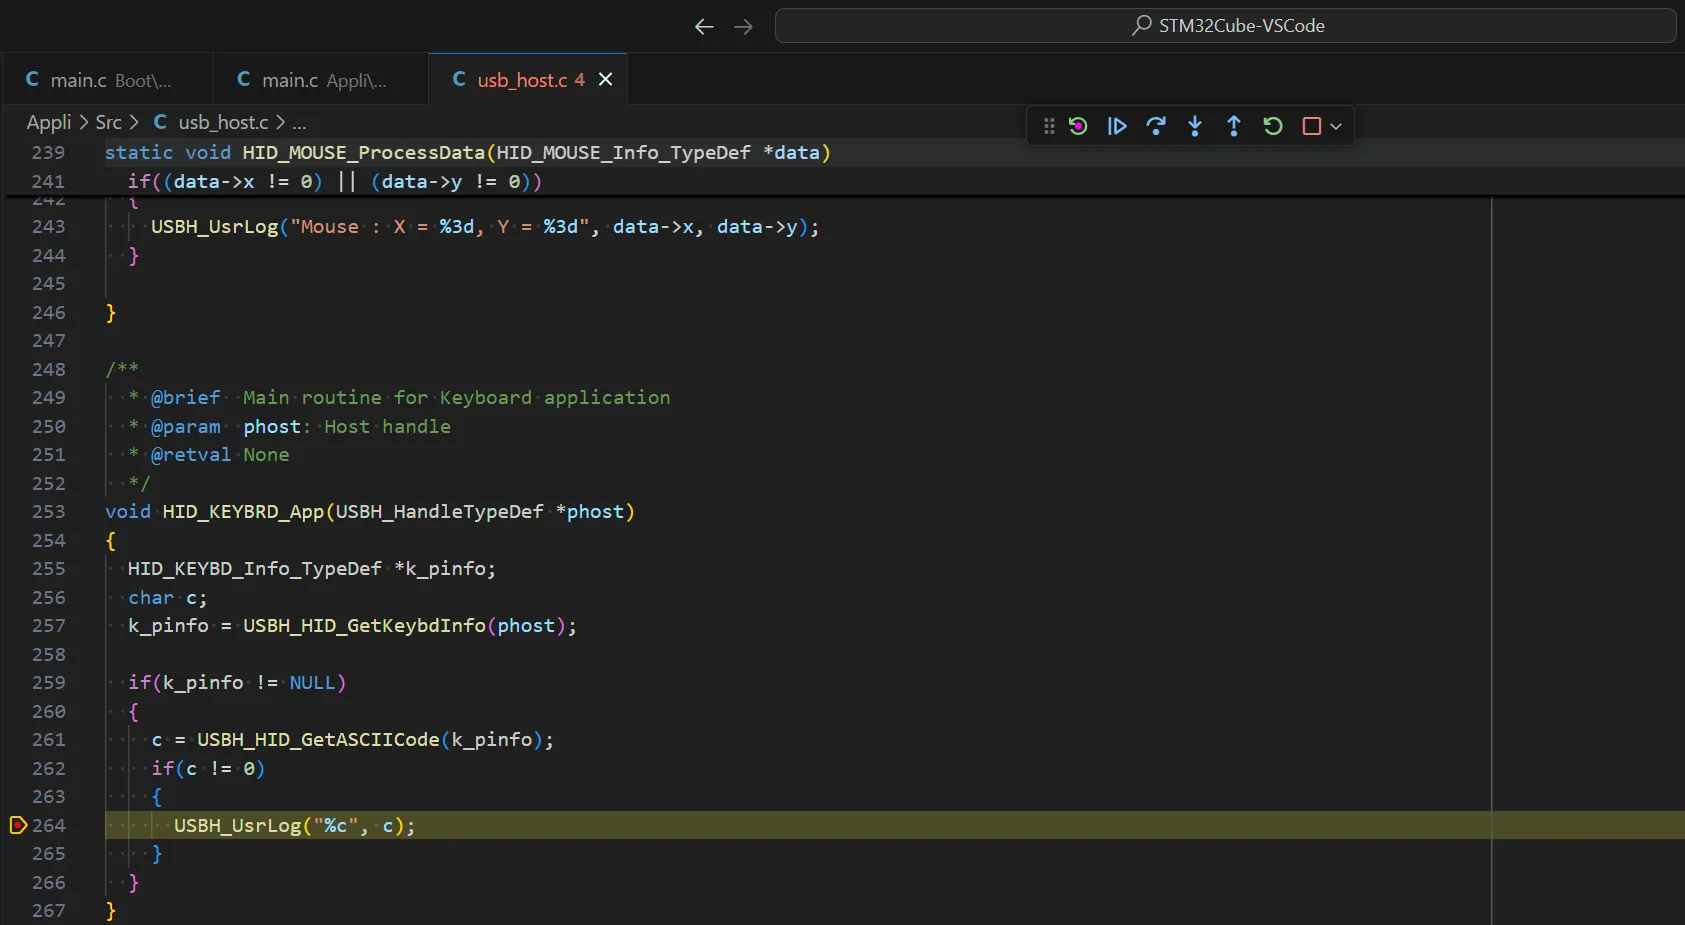
USBH_UsrLog() is the function that prints characters to the debug COM port. This is far from everything the application does, but it’s as far as we’ll go debugging it. Similarly, what I’ve shown so far is very much not everything there is to know about VS Code, but it’s as much as we’ll see in this article.
Next
Was anything unclear or confusing in this article? Is it adjacent-to, but not quite what you need? Email [email protected] and let me help.
Footnotes
-
I’m given to understand that the traditional expression is “workman,” but this is the version my dad liked. ↩
-
Excluding their IDE, which is terrible. I worked on Eclipse as a co-op student at IBM, so I’m sorry to say that Eclipse is terrible and everything based on it is terrible, including STM32CubeIDE. ↩
-
This approach also mostly works for Cursor, which is an IDE forked from VS Code that has an AI agent built-in. ↩
-
A thorough description of CMake is beyond the scope of this article, but compiling is the process of creating your program from source code. Compiling anything beyond an absolutely trivial program “by hand” (i.e., with handwritten compile commands) is incredibly tedious and error-prone, so programmers came up with “build systems,” which are small programs that compile the actual program you’re working on. One such build system is called Make, whose source files are called makefiles. But you need a separate makefile for each combination of compiler, Operating System, and chip you want to support, and writing make (or other build system) files by hand is also kind of tedious and error-prone, so programmers also came up with build system generators, like CMake, that generate the build system source files from even more abstract source files. So that’s instructions (CMake) for making instructions (Make) for making your instructions (the actual program). ↩
-
This is often called flashing the board because the program ends up in the flash memory, which is persistent (i.e., across power cycles, or turning the board off and back on). I am less certain of the etymology of flash memory itself, but apparently it comes from the mechanism for erasing the memory, which was reminiscent of a camera flash. ↩
-
Very briefly, upgrading a program means overwriting the program in memory. But that’s the very same program that’s performing the upgrade—what will you do while it’s being erased and over-written? One approach is to temporarily copy the program to RAM and execute from there. Another is to have the bootloader do the upgrade. The bootloader is simple enough that you (hopefully) never have to change it. ↩
-
F1, then Preferences: Open User Settings, then search for Editor: line numbers ↩